Google Chrome is a popular Web Browser owned by Google that is used almost all over the world, this browser offers a variety of features that support productivity such as adding several email accounts in it and adding extension features to support productivity. The add-on feature may be a differentiator from other browsers where you can use these extensions with various needs such as AI chatbot, translation tools and many more.
Chrome Extension is a creative way to add other features that may not be provided by the browser, you can create your own extensions that you want, besides being able to help you in the creative process, it can also be used by others by distributing it on the Chrome Web Store.
If you are looking for how to create a Chrome Extension itself, you are in the right article, because in this article I will make a simple tutorial on how to create your first simple extension or Add-on for Chrome Browser, maybe the tutorial we present is not as complete and sophisticated as other extensions, but by knowing how to make the basic creation of this utility, in the future you will be much easier in developing it. The basic knowledge that you must understand is the Javascript, HTML and CSS programming languages, Javascript is used as the basis for making this utility because it interacts with the Chromium-based engine, as well as HTML and CSS for display.
1. What is Chrome Extension
Chrome Extension is Javascript-based software designed to extend or enhance the functionality of the Google Chrome. This browser utilites can allow a user to get and customize a browsing experience that suits their needs and add features that are not provided by the Browser. To get them, you need to install them directly on the Chrome Web Store, which is a repository for all published extensions in various categories such as productivity, entertainment, developer tools, and security. With thousands or maybe millions available, it allows users to choose according to their individual needs.
This software works and is designed securely, the reason is that this software works in the browser sandbox and cannot access the operating system or outside the use of the browser without permission. When a developer or company publishes their extensions into the Chrome Web Store, they are required to comply with strict policies and regulations by explaining the application they created such as description, functions and access permissions required, therefore users will feel safe when using it.
Next, we will get into the main topic, which is the basics of how to create a simple Quote Generator Extension with Javascript, HTML and CSS.
2. Preparing the Necessary Files
We need to prepare several files needed, namely several icon images, manifest.json, popup.html, popup.js, and popup.css. This icon image must be prepared for visual representation to the browser, if you are confused about the meaning of this icon image, the icon images in the extension are the same as the favicon on the web and the size must follow the standards that must be met including 16x16, 48x48, and 128x128 pixels, supported formats PNG, JPG and SVG and placed in a special folder that is icon.
Next is manifest.json, manifest.json is also very important, because it contains information or metadata about the application created such as name, description, version, permissions, and what files are used while popup.html and popup.css are used for the User Interface that appears when the user uses and clicks the extension icon on the toolbar. The folder structure is something like this:
your-project/
├── manifest.json
├── popup.js
├── popup.html
├── popup.css
└── icons/
Next step we will set the metadata of manifest.json
3. Creating and configuring the manifest.json
As explained earlier, manifest.json is needed to provide information to users and the Chrome Web Store itself, without this file Chrome will not recognize the project created as an Extension application. Some important components that you must fill in:
- manifest_version: Indicates the manifest version used, currently most developers use the latest version 3.
- name and description: Basic information about the application, the name and description are filled in according to the purpose of the application.
- version: Represents the version number of the application, e.g. 1.0, 1.0.0, etc.
- icons: A folder containing a list of icon image files to be used.
- action: Specifies the action of popup.html when the extension is clicked.
- permissions: Defines the permissions required to run in the browser.
The following is the content of manifest.json
{
    "manifest_version": 3,
    "name": "Quote Generator",
    "description": "Generate random quotes with a single click!",
    "version": "1.0",
    "icons": {
        "16": "icons/icon16.png",
        "48": "icons/icon48.png",
        "128": "icons/icon128.png"
    },
    "action": {
        "default_popup": "popup.html",
        "default_icon": "icons/icon48.png"
    },
    "permissions": []
}
After the manifest file has been created, the next step we will create popup.html and popup.css files for the application interface and styling on its appearance.
4. Creating popup.html and popup.css for Interface and Styling
In this step is equally important, just like a web-based application, we must create an html document to make the page structure more attractive, therefore creating popup.html and popup.css files is needed in making this extension.
You can also experiment with adding third-party libraries both Javascript and CSS, such as JQuery, Bootstrap or Tailwind CSS to provide more intuitive interaction with users and give a professional impression to the application. Next, create a popup.html file and copy and paste the HTML code below:
<!-- How to Create Your First Chrome Extension in Minutes - Genelify -->
<!DOCTYPE html>
<html lang="en">
<head>
<meta charset="UTF-8">
<meta name="viewport" content="width=device-width, initial-scale=1.0">
<title>Quote Generator</title>
<link rel="stylesheet" href="popup.css">
</head>
<body>
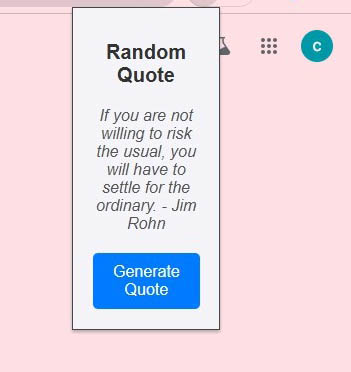
<div class="container">
<h1>Random Quote</h1>
<p id="quote">Click the button to get a quote!</p>
<button id="generateBtn">Generate Quote</button>
</div>
<script src="popup.js"></script>
</body>
</html> For the title, stylesheet, heading and other text, just adjust it to your needs. Next create a new file with popup.css to set the style on the html document to make it much more organized and attractive, copy and paste the CSS code below into your project:
/* How to Create Your First Chrome Extension in Minutes - Genelify */

body {
    font-family: Arial, sans-serif;
    margin: 0;
    padding: 0;
    background-color: #f4f4f9;
}

.container {
    text-align: center;
    padding: 20px;
}

h1 {
    font-size: 20px;
    color: #333;
}

#quote {
    margin: 20px 0;
    font-style: italic;
    font-size: 16px;
    color: #555;
}

button {
    background-color: #007bff;
    color: #fff;
    border: none;
    padding: 10px 20px;
    font-size: 16px;
    cursor: pointer;
    border-radius: 5px;
}

button:hover {
    background-color: #0056b3;
}
After the popup.html and popup.css files are created, we will enter the next very important step, namely creating a popup.js file in processing logic and the core part of an application so that it can be run in the Chrome.
5. Creating a popup.js for Application Logic
The last step we will create a Javascript file with the name popup.js which is tasked with running the application and logic of the extension we created, this file can also handle events or APIs to communicate with other parts of the browser. In this example, we use data without API, you can also use your own API to get data with the help of fetch function from Javascript. Please copy and paste the code below into your project:
// How to Create Your First Chrome Extension in Minutes - Genelify

// Array of quotes
const quotes = [
    "The best way to predict the future is to invent it. - Alan Kay",
    "Life is 10% what happens to us and 90% how we react to it. - Charles R. Swindoll",
    "Success is not the key to happiness. Happiness is the key to success. - Albert Schweitzer",
    "Do what you can with all you have, wherever you are. - Theodore Roosevelt",
    "Happiness is not something ready-made. It comes from your own actions. - Dalai Lama",
    "Your time is limited, don't waste it living someone else's life. - Steve Jobs",
    "If you are not willing to risk the usual, you will have to settle for the ordinary. - Jim Rohn"
];

// Handle button click
document.getElementById("generateBtn").addEventListener("click", function() {
    const randomIndex = Math.floor(Math.random() * quotes.length);
    const randomQuote = quotes[randomIndex];
    document.getElementById("quote").textContent = randomQuote;
});
After all the files are ready, the next step we will test and run it in the Chrome Browser, you can follow the steps below to test.
6. Testing your Extension in the Browser
To monitor whether the application created is ready to use or there are still errors, we need to test our application. To do so, here is how to do testing in the browser.
- Prepare your project folder.
- Open Chrome, type chrome://extensions in the URL address.
- Enable developer mode on the top right corner.
- Once the developer mode is active, select the load unpacked button.
- After that you will be directed to the file manager, then select the project folder that was created.
- If it is successful, the extension will appear in the list with the icon and name that you have specified earlier.
Congratulations you have created a simple Chrome Extension application, if you want to develop it further and plan to publish it to the Chrome Web Store in the future, some information from us may be useful to know what to do. You can create an account by using your Gmail account, but you are required to pay $5 for the registration fee, probably to tighten the regulations of the platform.
Conclusion
Creating a Chrome Extension like the simple tutorial we provided above is a simple process but provides useful insights into how browser development works. By understanding key components such as manifest.json, popup.html, popup.js, and popup.css, you can build functional tool browser that extend the browser capabilities and enhance the user experience by adding more features.
As with other types of applications, this browser tool can also be developed in stages, starting from a simple idea to something useful. This project can also serve as the basis for building more complex extensions in the future, so enjoy experimenting and taking your creative ideas to the next level!