Some modern browsers now have many features that make it easier for your application to make it easier for your users to use your application. With the development of technologies such as AI (Artificial Intelligence) that can perform tasks automatically which have been adopted by many large companies. To run AI, of course, you need a lot of large resources because the technology is highly dependent on the server or hardware specifications you use such as GPU, CPU and RAM. But this time, we give you a tutorial on how to create a Speech-to-Text application without using AI but using the built-in API features of browsers, especially in modern browsers, namely the Web Speech API.

1. What is the Web Speech API
In short, the Web Speech API is a free API or feature built into the browser that allows you to automate the processing of audio into text, one of the advantages of Web Speech Recognition is that processing can be carried out in real-time, because this API runs in the browser not on the server. This API is part of the Web Speech API, which is designed for web applications to receive voice input from a microphone, analyze it, and convert it to text.
With Web Speech Recognition, site owners can build interactive web-based applications that use voice as input, such as virtual assistants, language learning tools, and so on. This API is especially useful if you need voice input much more than typing, especially for mobile devices or environments that require hands-free operation.
2. Components of the Web Speech API
Some of the main components contained in Web Speech include SpeechRecognition Interface, Language Setting, Recognition Results, Operation Mode and Event Handling, here is the explanation:
SpeechRecognition Interface is a component used to control the voice recognition process in the input. This component will listen to the voice of the user and convert it into text.
Language Setting is a component to determine the language used during the recognition process and supports the recognition of various languages. Site owners can set the desired language properties, such as English (en-US), or other languages.
Recognition Results is the result of the voice processing process which will return two results, the first is interim results, interim results are used to display text that is still in a temporary stage while the user is speaking, and the last is final results, final results are the result of the entire text that is recognized and stored as the final result of the recognition process.
The Web Speech can be done in two ways, you can do the recognition process continuously in real-time until you stop the process manually, this mode is also called Continuous Mode. You can also do it only by listening once and stopping after voice recognition is complete or what is called Single Utterance Mode.
Next is Event Handling, Event Handling is a process where the application handles and responds to various events that occur during the speech recognition process. These events can be the start of speech recognition, the occurrence of errors, or when the recognition result text is complete.
This allows the application to interact accordingly, such as displaying the recognition result text, stopping the recording, or displaying an error message if the speech recognition fails. The following is an explanation of events that are often used:
1. Onstart event
This event signals to the user that the recognition process is in progress.
recognition.onstart = () => {
    console.log('Recording started...');
};
2. Onresult event
This event is the most important event, because here we can get the final text of the audio generated from the user.
recognition.onresult = (event) => {
    let text = event.results[0][0].transcript;
    console.log('Recognition results:', text);
};
And there are many more, next we will enter into the stage of creating a simple Web Speech Recognition application with only two files, namely HTML and JavaScript files, HTML is used to create a display to the user, and JavaScript files are used to store the Web Speech Recognition code that has been created.
3. Onspeechend event
This onspeechend event handles the end of speech. You can use this event to stop listening or display a message that speech recognition is complete.
recognition.onspeechend = () => {
    console.log('User stopped speaking.');
    recognition.stop();
};
4. Onend event
The onend event is used to notify the app that the recognition is complete, so that you can change the state or prepare the app to restart.
recognition.onend = () => {
    console.log('Recording complete.');
};
5. Onerror event
This event can be used if during the process an error occurs during speech recognition, for example when the user does not grant microphone permission, the internet connection is lost, or speech recognition cannot detect speech properly.
recognition.onerror = (event) => {
    console.error('An error occurred:', event.error);
};
6. Onaudiostart event
Can be used to provide a message to the user that the application has started listening to audio.
recognition.onaudiostart = () => {
    console.log('Audio start received.');
};
3. Creating the HTML structure
First, we will start by creating an HTML file with a simple HTML page that has buttons to start and stop voice recording, as well as a div element with id="text" that is used to display the transcribed text. You can create a new file with the name index.html and copy and paste the code below into your HTML file, here is the code content:
<!-- Creating a Simple Speech-to-Text Application with Javascript - Genelify -->

<!DOCTYPE html>
<html lang="en">
<head>
    <meta charset="UTF-8">
    <meta name="viewport" content="width=device-width, initial-scale=1.0">
    <title>Speech to Text App - Genelify</title>
    <style>
        body {
            font-family: Arial, sans-serif;
            margin: 50px;
            text-align: center;
        }
        #text {
            width: 80%;
            margin: 20px auto;
            padding: 10px;
            border: 1px solid #ccc;
            min-height: 150px;
        }
        button {
            padding: 10px 20px;
            font-size: 16px;
            cursor: pointer;
        }
    </style>
</head>
<body>
    <h1>Speech to Text App</h1>
    <div id="text">Text will shown here...</div>
    <button id="start-btn">Start</button>
    <button id="stop-btn" disabled>Stop</button>
    <script src="app.js"></script>
</body>
</html>
If the example above does not suit your taste, you can modify it by using CSS libraries such as Bootstrap or Tailwind CSS, please choose according to your wishes. After the process of creating HTML is complete, we will enter the final stage, namely creating JavaScript code to process recognition to the user.
4. Writing Javascript code for Speech-to-Text functionality
In the JavaScript section, we will use the Web Speech API to listen to the user's voice and convert it to text. You can create a new file with the name app.js then copy and paste the code below into your app.js file.
// Creating a Simple Speech-to-Text Application with Javascript - Genelify
// app.js

// Check if the browser supports the Web Speech API
if (!('webkitSpeechRecognition' in window)) {
    alert('Your browser does not support Web Speech API. Please use Google Chrome.');
}
else {
    // SpeechRecognition Initialization
    const recognition = new webkitSpeechRecognition();

    recognition.continuous = true; // Continuous listening
    recognition.interimResults = true; // Display interim results
    recognition.lang = 'en-US'; // Set language to English

    const startBtn = document.getElementById('start-btn');
    const stopBtn = document.getElementById('stop-btn');
    const textDiv = document.getElementById('text');

    let finalText = '';

    // When speech is recognized
    recognition.onresult = (event) => {
        let interimText = '';
        for (let i = event.resultIndex; i < event.results.length; i++) {
            const text = event.results[i][0].transcript;
            if (event.results[i].isFinal) {
                finalText += text;
            } else {
                interimText += text;
            }
        }
        textDiv.innerHTML = `<strong>Final:</strong> ${finalText} <br/><strong>Interim:</strong> ${interimText}`;
    };

    // Button to start recording
    startBtn.addEventListener('click', () => {
        recognition.start();
        startBtn.disabled = true;
        stopBtn.disabled = false;
    });

    // Button to stop recording
    stopBtn.addEventListener('click', () => {
        recognition.stop();
        startBtn.disabled = false;
        stopBtn.disabled = true;
    });

    // When recording is complete
    recognition.onend = () => {
        startBtn.disabled = false;
        stopBtn.disabled = true;
    };

    // If an error occurs
    recognition.onerror = (event) => {
        console.error('Speech recognition error:', event.error);
        startBtn.disabled = false;
        stopBtn.disabled = true;
    };
}
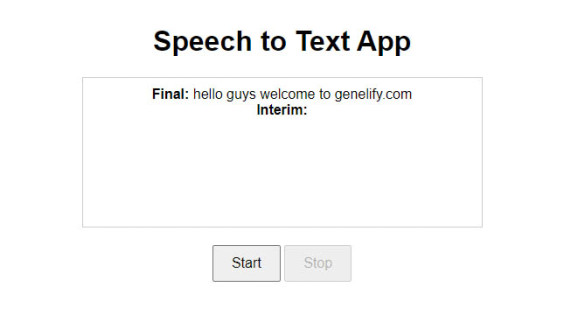
How does the JavaScript code work or flow? When the Start button is clicked, the application will start to listen to the user's voice and display the results in the id="text" element. Interim results during the recording process will appear on the screen while the user is still speaking, and the final results will be saved and displayed after the user has finished speaking. The user can stop the recording at any time by clicking the Stop button.
You need to know, make sure the user uses a browser that supports the Web Speech API such as Google Chrome, then you can also customize the desired language by changing the property on recognition.lang. You can see the end result in the image below.

Conclusion
Web Speech API is a tool in web application development that allows speech recognition directly in the browser and site owners can create more interactive applications. Although this API is very efficient in handling voice input, its use still has drawbacks, such as relying heavily on browser support and requiring a stable internet connection.
This browser API feature can provide an easy-to-use solution for making web applications more interactive and inclusive, especially for creating applications that want to add Voice To Text features to your project.

