REST API is a component in the website that must be mastered by web developers, because almost all websites in this world use APIs to exchange data because of its advantages, which are very fast and light. To create a REST API, we need a framework to handle the API system that you will create, nowadays many people use Lumen to create a REST API because it is lightweight and scalable. Lumen is part of Laravel which is a leaner and faster micro-framework, so Lumen is very suitable for use if only building REST API systems.
In this article, we will provide a concise and clear tutorial for creating a REST API using Lumen.

1. Install the Lumen framework
Before building the REST API, of course, we must first install the Lumen framework, open a terminal and enter the following command:
composer create-project --prefer-dist laravel/lumen rest-api-using-lumen Wait until the installation process is successful and it will automatically create a new folder called rest-api-using-lumen, you can rename the project as you wish, if using Visual studio code, continue by opening the code editor with the command:
code . If you are using XAMPP, you can follow these steps, create a folder in htdocs according to your project name, then open a terminal, point the terminal to your project directory, then enter the following command:
composer create-project --prefer-dist laravel/lumen Wait until the installation process is complete, if you have entered the command:
code . Then it will automatically be directed to Visual Studio Code with the contents of the Lumen project that was already installed.
2. Database configuration
The next step is database configuration, create a database in your mysql after that open the .env file, adjust the database name and others, for example:
APP_NAME=Lumen
APP_ENV=local
APP_KEY=
APP_DEBUG=true
APP_URL=http://localhost
APP_TIMEZONE=UTC

LOG_CHANNEL=stack
LOG_SLACK_WEBHOOK_URL=

DB_CONNECTION=mysql
DB_HOST=127.0.0.1
DB_PORT=3306
DB_DATABASE=lumen_rest_api
DB_USERNAME=localhost
DB_PASSWORD=root

CACHE_DRIVER=file
QUEUE_CONNECTION=sync
In this example, we use mysql for database and data storage. The next step is the migration process.
3. Database migration
If the configuration process is complete, the next step is the data migration process that we will create, open a terminal in your VScode, then follow the following command to create a new migration:
go to lumen folder:
cd lumen then enter the migration command which is:
php artisan make:migration create_users_table If it is finished, it will automatically create a new file in the database/migrations folder, open the file we will create some new attributes for the data we need such as name, email, you can follow the code below:
<?php

use Illuminate\Database\Migrations\Migration;
use Illuminate\Database\Schema\Blueprint;
use Illuminate\Support\Facades\Schema;

class CreateUsersTable extends Migration
{
/**
* Run the migrations.
*
* @return void
*/
public function up()
{
    Schema::create('users', function (Blueprint $table) {
        $table->id();
        $table->string('name');
        $table->string('email');
        $table->timestamps();
    });
}

/**
* Reverse the migrations.
*
* @return void
*/
public function down()
{
    Schema::dropIfExists('users');
}
Once done, follow the following command to create the user table:
php artisan migrate Then attributes such as name, email have been created automatically.
4. Create a new model
The next step is to create a new file in the app/Models folder with the name users.php, then follow the code below:
<?php

namespace App\Models;

use illuminate\Database\Eloquent\Model;

Class Users extends Model
{
    protected $table = 'users';

    protected $fillable = [
        'name', 'email'
    ];
}
In the Lumen framework we need to do additional configuration when using Eloquent and Facades, you can go into the Bootstrap folder then open the App.php file, find and uncomment the following line of code:
$app->withFacades();
$app->withEloquent();
$app->register(App\Providers\AppServiceProvider::class);
$app->register(App\Providers\AuthServiceProvider::class);
$app->register(App\Providers\EventServiceProvider::class);
5. Create a new controller
After completing the configuration and creating a new model file, the next step is to create a new file in the app/Http/Controllers folder, create a new file with the name UsersController.php, you can follow the code below:
<?php

namespace App\Http\Controllers;

use App\Models\Users;
use Illuminate\Http\Request;

class UsersController extends Controller
{
    protected $limit = 5;

    // Index
    public function index()
    {
        $users = Users::paginate($this->limit);

        return response()->json([
            'status' => 'success',
            'data' => $users->items(),
            'pagination' => [
                'total' => $users->total(),
                'per_page' => $users->perPage(),
                'current_page' => $users->currentPage(),
                'last_page' => $users->lastPage(),
                'from' => $users->firstItem(),
                'to' => $users->lastItem(),
            ]
        ], 200);
    }

    // GET Method
    public function show($id)
    {
        $users = Users::find($id);
        if(!$users) {
            return response()->json([
                'status' => 'error',
                'message' => 'User not found!'
            ], 404);
        }

        return response()->json([
            'status' => 'success',
            'message' => $users
        ], 200);
    }

    // PUT method
    public function store(request $request)
    {
        // Validation
        $this->validate($request, [
            'name' => 'required',
            'email' => 'required'
        ]);

        $users = new Users();
        $users->name = $request->input('name');
        $users->email = $request->input('email');
        $users->save();

        return response()->json([
            'status' => 'success',
            'message' => 'User has been successfully added!'
        ], 201);
    }

    // UPDATE method
    public function update(request $request, $id)
    {
        // Validation
        $this->validate($request, [
            'name' => 'required',
            'email' => 'required'
        ]);

        $users = Users::find($id);
        if(!$users) {
            return response()->json([
                'status' => 'error',
                'message' => 'User not found!'
            ], 404);
        }
        $users->name = $request->input('name');
        $users->email = $request->input('email');
        $users->save();

        return response()->json([
            'status' => 'success',
            'message' => 'User has been successfully updated!'
        ], 200);
    }

    // DELETE method
    public function destroy($id)
    {
        $users = Users::find($id);
        if(!$users) {
            return response()->json([
                'status' => 'error',
                'message' => 'User not found!'
            ], 404);
        }
        $users->delete();

        return response()->json([
            'status' => 'success',
            'message' => 'User has been successfully deleted!'
        ], 200);
    }
}
6. Setting the route
After finishing creating controller files for users, the next step is to set the route for each method, open the Web.php file in the Routes folder, you can add additional lines by entering the code below:
$router->group(['prefix' => 'api/v1/users'], function () use ($router) {
    $router->get('/', 'UsersController@index');
    $router->get('/{id}', 'UsersController@show');
    $router->post('/', 'UsersController@store');
    $router->put('/{id}', 'UsersController@update');
    $router->delete('/{id}', 'UsersController@destroy');
});
For routers, we give an example by directing each method with a URL prefix, namely api/v1/users, after everything is done, let's test it using your favorite testing API.
7. Testing API endpoints
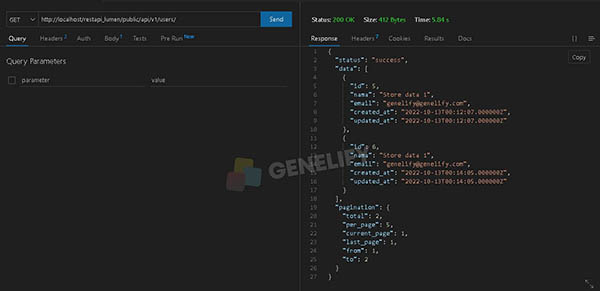
At this stage, we will test the REST API that we have created with LUMEN, this time we will give an example using the API Tester from the Thunder Client or it could be with Postman, before testing, first run your lumen application, then navigate to the endpoint URL according to criteria, the following is an example of the results of the REST API testing that we have run.
1. Adding a new user

2. Fetch all users

3. Retrieve user by id

4. Change user data based on id

5. Delete user by id

The simple REST API application with Lumen has been successfully executed, each method we tested includes, POST, GET, PUT and DELETE.
Conclusion
Finally we have succeeded in making a REST API with lumen using the GET, POST, PUT and DELETE methods, you can also use the examples from this tutorial according to your application needs, from the results of the performance test of this framework, we think it is quite fast and responsive, Lumen framework is indeed very suitable to be used for using REST API systems because of its relatively small size and faster, but unlike Laravel, in this micro-framework we need additional configuration to run REST API applications using Lumen.
The components that we have created are not enough to create a REST API, you can also modify it by adding Authorization, Rate limiting and others.

