CRUD has become a standard that must be mastered by web developers in web development, regardless of the programming language, because CRUD itself is basic in application workflows such as creating new data, updating existing data, deleting existing data and reading data. For example Instagram, Instagram itself uses CRUD in its data management such as updating profiles, deleting or adding new posts, changing captions on photos and so on, if previously we discussed CRUD in PHP programming languages such as Laravel, Lumen or Native PHP, this time we will discuss how to create CRUD in the Python programming language using the Django web framework.
In this tutorial you are required to first master the Python programming language, the Python programming language itself is often used in the development of Machine Learning, desktop applications, mobile applications in addition to web development. Unlike PHP which mostly uses MVC architecture, Django is a little different, Django itself uses MVT or Model-View-Template architecture in its implementation, okay we just go straight into the topic of step by step explanation.

1. Preparation and installation
Before continuing, make sure your computer has Python installed, if not, you can install it on your computer first, you can visit the official website of python, https://www.python.org to download the package installer of Python itself, version 3.8 and above is recommended. If everything is ready, open your favorite code editor, create a new folder and project because we will install Django using PIP, open the terminal in your code editor and enter the following command:
pip install django Wait until the installation process is complete, and we'll enter the coding process. The next step is to create a new application into our CRUD project, you can enter the following command to create the project automatically, namely:
python django-admin startproject my_project You can rename the project to your liking by changing “my_project” to whatever you want, after the process of creating the application is complete, you will see a new folder with the project name you have specified before with the required files such as manage.py, settings.py, urls.py and others. These files will later be used to set routing, templates and others.
To test whether Django is installed, please enter a command into your terminal code editor with the value:
python manage.py runserver Then navigate to the url provided by the webserver provided by Django, if you see the following image, it means that Django is properly installed into your project.

2. Create a new application in the project
Assuming we're going to create a book storage project in a CRUD application, we'll create a django app named books with the command:
python manage.py startapp books Once done, you'll see a new folder with the name “books” which contains a collection of files in managing the CRUD we'll create such as models.py, views.py, apps.py and others, the next step we also need to register the books application into the settings located in my_project/settings.py, find the following line of code then enter “books” into it:
# settings.py

# Application definition
INSTALLED_APPS = [
    ...,
    # add this line
    "books",
]
3. Creating database, models and views.py
The next step we will create a new model, enter the books/models.py folder and enter the following code:
# models.py
from django.db import models

class Book(models.Model):
    title = models.CharField(max_length=100)
    author = models.CharField(max_length=50)
    publication_date = models.DateField()

    def __str__(self):
        return self.title
The code above will be used to retrieve data in the database, we can use a dummy for our CRUD application testing process, you can use the Migration feature which will create dummy data for the database, follow the command below:
python manage.py makemigrations
python manage.py migrate
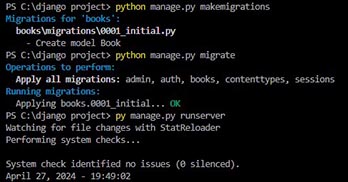
After the migration process and creating the database have been completed, we will enter the next stage, namely in views.py, views.py functions to handle incoming data requests, retrieve data in the model and create the functions needed to handle each in the CRUD method such as create, read, update and delete, views.py contains logic on the view display in the application, because Django itself uses the MVT Model-View-Template architecture. please navigate to the books/views.py folder, then enter the following code:
# views.py
from django.shortcuts import render, redirect
from .models import Book
from .forms import BookForm

def book_list(request):
    books = Book.objects.all()
    return render(request, 'book_list.html', {'books': books})

def add_book(request):
    if request.method == 'POST':
        form = BookForm(request.POST)
        if form.is_valid():
            form.save()
            return redirect('book_list')
    else:
        form = BookForm()
    return render(request, 'add_book.html', {'form': form})

def edit_book(request, pk):
    book = Book.objects.get(pk=pk)
    if request.method == 'POST':
        form = BookForm(request.POST, instance=book)
        if form.is_valid():
            form.save()
            return redirect('book_list')
    else:
        form = BookForm(instance=book)
    return render(request, 'edit_book.html', {'form': form})

def delete_book(request, pk):
    book = Book.objects.get(pk=pk)
    book.delete()
    return redirect('book_list')
Don't forget to create a new file with the name forms.py, forms.py aims to define forms in Django, this file is used to retrieve data inputted by the user and validate the incoming data.
# forms.py
from django import forms
from .models import Book

class BookForm(forms.ModelForm):
    Meta class:
        model = Book
        fields = ['title', 'author', 'publication_date']
Next we will create templates that contain HTML files to display to the user.
4. Creating templates
The next stage is to create templates, templates themselves function as an intermediary between our application and the user, which renders the display dynamically based on the data provided by the user to the application backend, where the files contained in the templates folder contain a set of HTML that handles each requirement, if you are familiar with Laravel, maybe this template is exactly the same as the *.blade.php file. In the case of this tutorial, we need 4 HTML files, namely reading the book list, updating books, adding books and deleting books.
Create a new folder inside the book folder with the name templates, then create each file, namely: add_book.html, book_list.html, delete_book.html and edit_book.html, enter the following code into each file:
1. add_book.html
<!-- add_book.html -->
<!DOCTYPE html>
<html lang="en">
<head>
    <meta charset="UTF-8">
    <title>Add Book</title>
</head>
<body>
    <h1>Add Book</h1>
    <form method="post">
        {% csrf_token %}
        {{ form.as_p }}
        <button type="submit">Save</button>
    </form>
</body>
</html>
2. book_list.html
<!-- book_list.html -->
<!DOCTYPE html>
<html lang="en">
<head>
    <meta charset="UTF-8">
    <title>Book List</title>
</head>
<body>
    <h1>Book List</h1>
    <ul>
        {% for book in books %}
            <li>{{ book.title }} - {{ book.author }} - {{ book.publication_date }}</li>
            <a href="{% url 'edit_book' book.pk %}">Edit</a>
            <a href="{% url 'delete_book' book.pk %}">Delete</a>
        {% endfor %}
    </ul>
    <a href="{% url 'add_book' %}">Add Book</a>
</body>
</html>
3. delete_book.html
<!-- delete_book.html -->
<!DOCTYPE html>
<html lang="en">
<head>
    <meta charset="UTF-8">
    <title>Delete Book</title>
</head>
<body>
    <h1>Are you sure you want to delete this book?</h1>
    <form method="post">
        {% csrf_token %}
        <button type="submit">Delete</button>
    </form>
</body>
</html>
4. edit_book.html
<!-- edit_book.html -->
<!DOCTYPE html>
<html lang="en">
<head>
    <meta charset="UTF-8">
    <title>Edit Book</title>
</head>
<body>
    <h1>Edit Book</h1>
    <form method="post">
        {% csrf_token %}
        {{ form.as_p }}
        <button type="submit">Update</button>
    </form>
</body>
</html>
If everything is done, we will set the routes needed for our application to run properly. The following is the file and folder structure in the CRUD project using Django:
django project/
├── my_project/
│   ├── __init__.py
│   ├── settings.py
│   ├── urls.py
│   └── wsgi.py
├── books/
│   ├── migrations/
│   ├── templates/
│   │   ├── book_list.html
│   │   ├── add_book.html
│   │   ├── edit_book.html
│   │   └── delete_book.html
│   ├── __init__.py
│   ├── admin.py
│   ├── apps.py
│   ├── models.py
│   ├── tests.py
│   └── views.py
├── manage.py
└── db.sqlite3
5. Defining routes
In order for our application to run in the browser, we need routes, in Django to define routing, we set it up in the my_project/urls.py folder. This file serves to specify the URL by pointing to the appropriate view, without routing, your application cannot be accessed by the user even though it runs properly on the backend process. In Django you can use regular expression patterns to capture strings in the URL in the browser, in this case since we only use 4 routes, namely create, read, delete and update, we will add them as needed.
Enter the my_project/urls.py folder, then customize your code with the code below:
# urls.py
from django.urls import path
from books import views

urlpatterns = [
    path('', views.book_list, name='book_list'),
    path('add/', views.add_book, name='add_book'),
    path('edit/<int:pk>/', views.edit_book, name='edit_book'),
    path('delete/<int:pk>/', views.delete_book, name='delete_book'),
]
Congratulations you have successfully created a basic CRUD application using the Django framework in Python. For the final result, you can see some images below:

Read & Delete Book

Update Book

Adding a new book
Conclusion
Django is a very popular web framework used by individuals and companies in managing their content on the internet, the ease and support of a very large community, makes the Django framework highly recommended to learn and use on small and large scale projects, supported by various databases such as MySQL, sqlite3, postgree and Mongodb, making this framework very powerful. You can also combine your project with Machine Learning applications in your Django project because both use the Python programming language.